Team setup and sharing access to Helpdesk Issues and works
How to set up teams for shared access to issues and tasks
If you set up your teams correctly you can allow any member of a team to take charge of any Helpdesk issue that is assigned to the team. Here's how to do it.
The team card
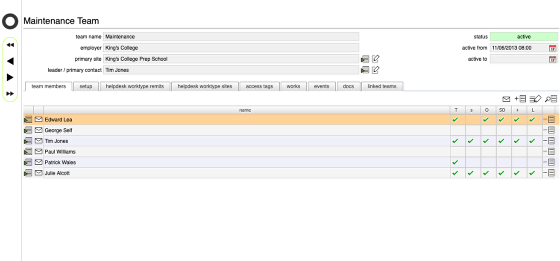
Start by accessing the relevant team card (either from your Home card or the relevant employer's home card) - you should be logged in as the employer or the team leader in order to do this.
The team setup tab
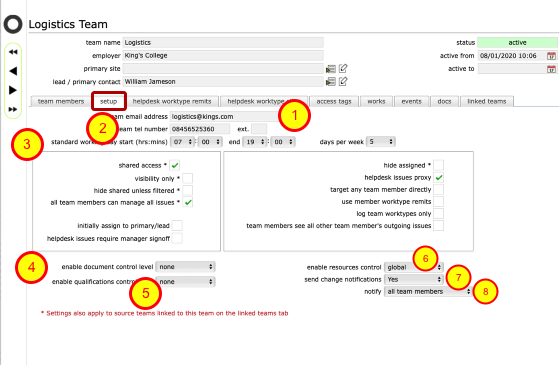
The team setup tab controls many aspects of how the team operates and shares access to helpdesk issues, works and other things.
Basic team settings:
- The team email address - this will be used to notify the team directly where issues and orders are issued to the team rather than to any specific team member
- The team telephone contact number
- The team standard working hours (this operates in addition to individual employees working hours which are specific on the client (employer) preferences for employees and in individual employees employment contracts). Options exist to prevent email notifications from being sent outside of working hours if these options are set up.
- Document control option - set to enable all team members to manage all documents for the relevant client (employer)
- Qualifications control option - set to enable all team members to manage all employee qualifications and training for all employees for the relevant client (employer)
- Resources management option - set to enable all team members to manage resources/asset register objects either globally for the client (employer) or based on assigned access tags on the access tags tab list. If the team is assigned to a specific site then the notifications will only be sent in relation to resources that are located on that site - in this context 'global' refers to all resources on the specified site rather than all resources across all sites.
- Send change notifications - set to Yes to ensure that the team is notified of all changes to resources/asset register objects. This will include additions, deletions, status changes, location changes.
- Select the notify option - send change notifications to just the team email address or to all team members and the team email address
Basic helpdesk team setup controls
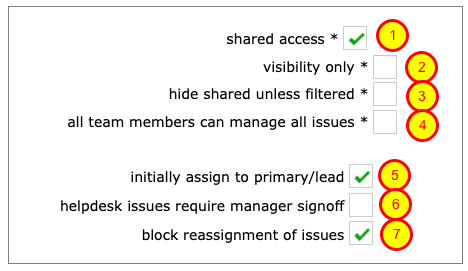
The team setup controls in the left hand pane of the team setup tab provide these functions:
- To enable shared access by team members to helpdesk issues and works assigned to the team, click the shared access checkbox on the team setup tab.
- The visibility only option allows you to ensure that team members can see all issues for the team but can only interact with issues assigned to them directly and they will not be able to access the Accept button (see below)
- Set the hide shared unless filtered option to initially hide shared issues from team members, limiting the Helpdesk issues list to their own issues only. Issues assigned to others or unassigned can still be found using the filters.
- The all team members can manage all issues setting does what it says: any team member can act as if they are in charge of any issues and take any relevant actions accordingly. This can be very useful for teams with full shared responsibility and removes the requirement to individually assign issues. Event logs will always indicate exactly who did what and when.
- Set initially assign to primary / lead option to always assign the issue to the lead initially as well as assigning to the team generally. This will set the primary contact / lead as the person in charge of the issue and therefore the issue will not be available for team members to self-assign unless the issue is released back to the team by the person in charge.
- The helpdesk issues require manager sign-off option, when ticked, will mean that team members will not be able to fully sign-off helpdesk issues when complete - the issue will be marked as 'completed' and a sign-off request will be sent to the relevant team lead / manager for final inspection and sign-off. NOTE that the setting can be applied to individual team members on the team members tab list instead if required.
- (Client admin users ONLY) The block reassignment of issues option will prevent team members from reassigning helpdesk issues to others. If this option is ticked, then any reassignments will need to be handled by managers only.
Additional helpdesk team setup controls
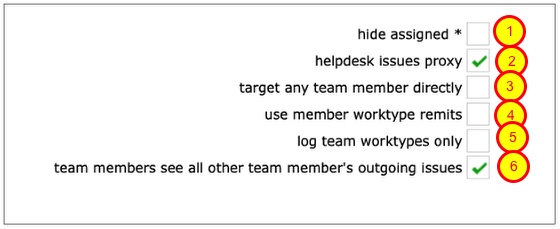
The team setup controls in the right hand pane of the team setup tab provide these functions:
- Tick the hide assigned option to ensure that helpdesk issues that have been assigned to a team member are no longer visible to other team members.
- The helpdesk issue proxy option will allow any team member to log new helpdesk issues on behalf of any other employee, identifying the relevant employee as the 'caller' and therefore the recipient of update notifications..
- Target any team member directly - allows managers to log a new issue and target it directly to a specific team member during the logging process.
- Use member worktype remits - issues are targeted at teams automatically based on the remits that are set up for the team. Setting this option will mean that the remits listed on the worktype remits tab for the team will reflect those remits set up individually for each team member on their individual contact records worktype remits tab. If this is NOT set, the team remits can be added for the team as whole directly on the worktype remits tab on the team record.
- Log team worktypes only - this is a restriction and limits team members to logging new helpdesk issue faults and service requests for worktypes that match those on the team's helpdesk worktype remits tab.
- Team members see all other team members outgoing issues - use with care! If this is set then all team members will see all fault reports and service requests of any type logged by any team member. This can be useful when it is important to know whether another of the team has already logged a porterage request for an event for example.
Taking charge of a Helpdesk issue
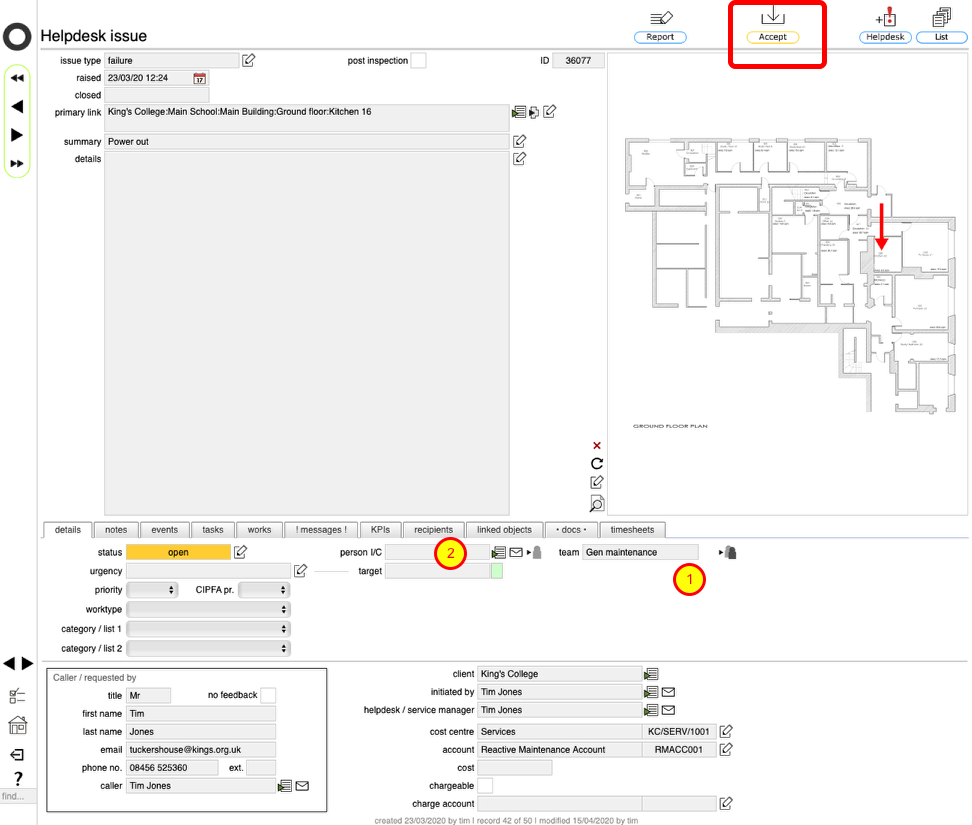
This Helpdesk issue has been assigned to the team only - you can see this as the team is identified (1) and no person in charge has been set (2).
To accept responsibility for an issue, click the Accept button.
NOTE: The Accept button will only be visible if the visibility only option on the team setup tab is OFF / unchecked.
Confirm acceptance
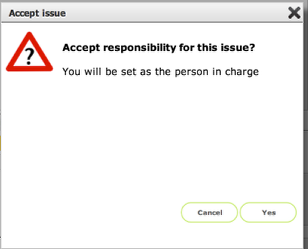
Click Yes to confirm that you are accepting responsibility for this issue.
Issue assigned

The issue is now assigned (1) and the Accept button has gone. You are now in charge of this issue.
NOTE: You can reassign the issue to someone else or even release it back to the team generally using the Assign to person button to the right of the person i/c field.