Allocating a task to multiple resources at once
How to add the same task to multiple objects at once
Overview
It is often much quicker to allocate the same task to multiple resource objects at once rather than allocating the task to each object individually. This is especially true if all the tasks are to be triggered on the same start date. The process is much the same as allocating a task to a single resource, but with the additional steps of selecting a set of resources first.
Start on a single resource
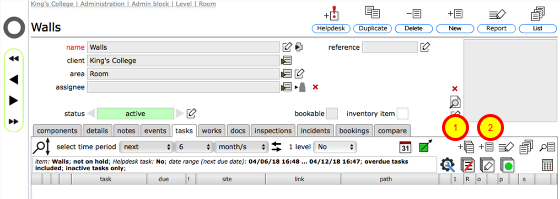
Start by navigating to one of the resources you want to allocate the task to. In this case we are going to add a painting task to a set of wall areas across the site so we have navigated to one of the walls in question.
To allocate a task to multiple resources at once, use the Add Multiple (1) button rather than the more usual Add Task button (2)
Confirm action
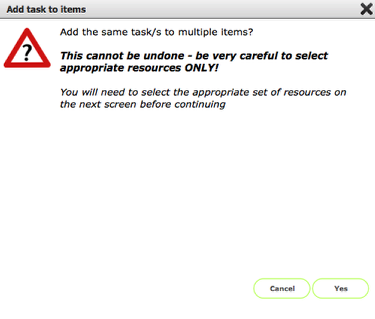
Note the guidance note to check your selection of resources carefully during this process!
Click Yes to continue.
Set scope of resource selection
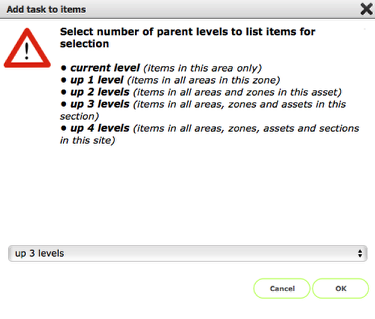
This next dialog is to do with limiting the number of resource objects listed in the next step. Depending on where you started you can select 'current level only' all the way to a maximum of 'up 5 levels'.
The different choices mean:
• current level only (applies at all levels) - only resources at this level will be listed. In this example, all the resource objects contained in the same area (room) as the current resource will be listed. This choice is appropriate if you wish to allocate the same task to a number of resources that are all in the same location.
• up 1 level (applies at asset, zone, area, item and component levels) - all resources at this level and 1 level up will be listed. In this example, all the resource objects contained in all the areas (rooms etc) in the current zone will be listed. This choice is appropriate if you wish to allocate the same task to a number of resources on the same floor of a building say, but in different areas or rooms.
• up 2 levels (applies at zone, area, item and component levels) - all resources at this level and 2 levels up will be listed. In this example, all the resource objects contained in all the areas (rooms etc) in all the zones (floors) will be listed. This choice is appropriate if you wish to allocate the same task to a number of resources on different floors of the same building say, and in different areas or rooms.
• up 3 levels (applies at area, item and component levels) - all resources at this level and 3 levels up will be listed. In this example, all the resource objects contained in all the areas (rooms etc) in all the zones (floors) in all buildings in a single section of the site will be listed. This choice is appropriate if you wish to allocate the same task to a number of resources on different floors of multiple buildings (or outside spaces) say, and in different zones, areas or rooms.
• up 4 levels (applies at item and component levels) - all resources at this level and 4 levels up will be listed. In this example, all the resource objects contained in all the areas (rooms etc) in all the zones (floors) in all buildings on all sections of the site will be listed. This choice is appropriate if you wish to allocate the same task to a number of resources on different floors of multiple buildings (or outside spaces) say, and in different sections, zones, areas or rooms.
• up 5 levels (only applies at component level) - all resources at this level and 5 levels up will be listed. In this example, all the component resource objects for all items contained in all the areas (rooms etc) in all the zones (floors) in all buildings on all sections of the site will be listed. This choice is appropriate if you wish to allocate the same task to a number of component resources on different floors of multiple buildings (or outside spaces) say, and in different sections, zones, areas or rooms.
NOTE: at section level the only option is current level only, so if you are allocating tasks at the section level no choice is given!
Click OK to continue when you have made your choice.
Provisional list of resources
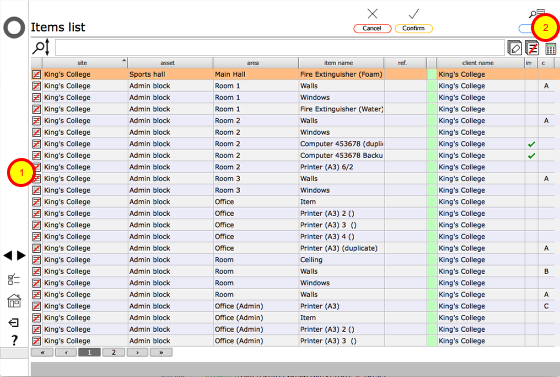
In this example we selected up 3 levels as the choice, so we now have a list of all items in all rooms in all buildings of the current section of the site. You can remove unwanted resources from the list one by one by clicking the omit button (1) to the left of the appropriate resource. This is fine if you only need to remove one or two objects.
Usually it is quickest to use the filters (2) to refine and reduce the list further.
Refine the list with filters
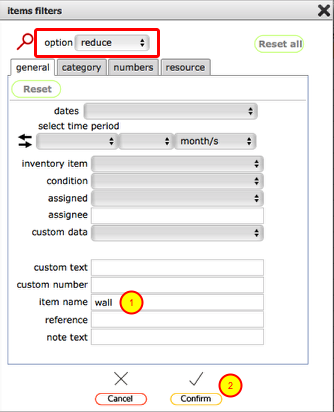
Use any combination of filter criteria to refine the list further. In this example we want to quickly locate all the walls, so we have put 'wall' as the criteria in the 'item name' field (1). This will reduce the list to only those items containing 'wall' in their name.
Click the filter button (2) to execute the search.
NOTE: the option when using the filter during this part of the process is a reduce search - i.e. to reduce the list you have currently down to the set of resources that you want to apply the new task to.
The reduced list
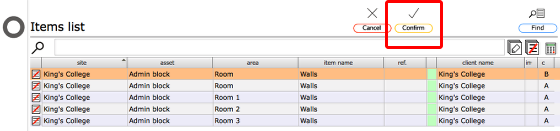
Now we have a list of resource all containing the text 'wall' in their name. We could use the filters again to reduce further if necessary, or use the omit button now to remove those few resources that are not required.
Now we have the final list of resources that we are going to allocate the new task to.
Click Confirm to continue to the task selection.
The task selection form
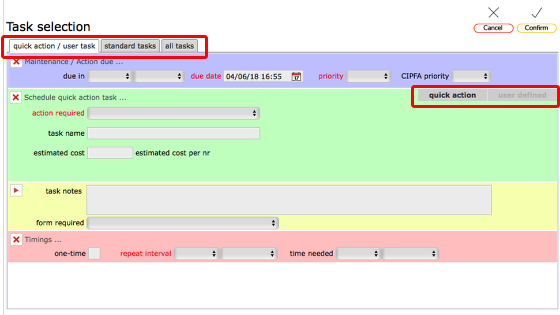
Now you have the same choices as when adding a single task to a single resource:
- add a simple quick action task
- define and add a user defined task
- select a task from your availble standard tasks list
- select a task from your all tasks list
Please see the lessons on adding tasks from these different tabs / lists for more detail:
Adding simple tasks
Selecting and adding from the standard tasks list
Selecting and adding from the all tasks list
Creating and adding a user defined task
Calculating units of measure when applying a task to multiple locations
As you select tasks they will be added to the Current selection list at the bottom.
For each task added, you can individually set the due date, priority, CIPFA priority, one-time flag or repeat interval and expected duration. These entries will be allocated to the task as it is set up for each resource in the list previously confirmed. The quantity that is applied depends on the task selected and the unit of measure of the target resources.
Example 1 (unit of measure is the same for selected task and all target resources):
- The selected task is to paint the walls with emulsion paint - the unit of measure for this task is square metres (m2);
- The selected resources are all areas of wall in a variety of locations - the unit of measure for the wall areas is also square metres (m2);
- When the task is applied for each of the wall areas, the measurement of the individual wall area will be used to calculate the cost of applying that task to that object i.e. the cost in this case IS multiplied by the number of m2 for the wall area in each location.
Example 2 (unit of measure is different for the selected task and the target resources):
- The selected task is re-carpet the floor in a room that measures 15-20 square metres - the unit of measure for this task is number (nr), i.e. a total cost for the room;
- The selected resources are all floor areas in a variety of locations - the unit of measure for the floor areas is square metres (m2);
- When the task is applied for each floor area, the unit of measure for the task (nr) overrides the unit of measure for the floor areas and the cost will be the single cost for re-carpeting the room i.e. the cost in this case is NOT multiplied by the number of m2 for each floor area.