Setting up User Preferences
Preference settings that apply to all users
Viewing and setting personal preferences

On your home card there is a Preferences button - click this to access your personal preference settings for Flow360
Accessing personal preferences using the mini preferences button
This button will take you directly to your preferences. It is found on most screens at the bottom left in the sidebar and also appears on the main start screen.
Personal Preferences card - basic preferences
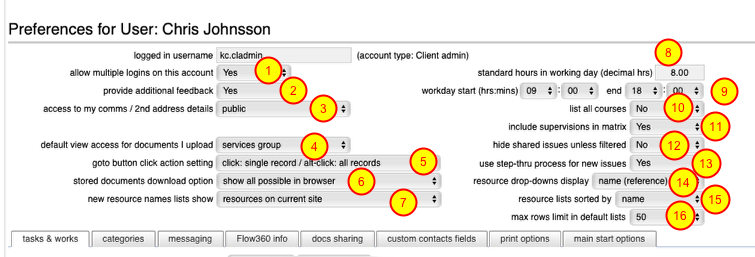
The currently logged in user account and account type are shown for reference at the top of the main preferences panel.
- Allow multiple logins on this account - default is 'Yes'. Set to No to restrict access by yourself to only one computer at a time. Remember that access is secure and password protected so setting this to No is not recommended for most users.
- Provide additional feedback - initial default is 'Yes'. Set this to No to have restrict dialogs show during operations to giving more feedback and confirmation of steps.
- Access to view my comms details - this is either public or private. In this context, 'public' is still restricted to other users who can see your contact card, which is generally only those people that work with you or are involved on your site.
- Default access setting for documents that you add to Flow360 - default is 'services group'. This means that anyone who can access an object (resource, works order, inspection record etc) that a document is linked to can access and share the document. You can change the setting retrospectively for any documents that you have added.
Document access setting options:
- private - only you can access the document, no matter what it is linked to
- client group - restricts access to those in the same client group as you. This means other client admin or client staff users.
- site group - restricts access to those who work on the same sites as you. This means client admin, client staff, managers and surveyors.
- services group - restricts access to those who work on and provide services on the same sites as you. This means client admin, client staff, managers, surveyors, general users, service providers
- list - restrict access to named individuals only
5. Goto Button click action setting - some goto buttons on list views have an extended function (these buttons have a yellow pointer). The default setting for these buttons is that a normal click will load only the current selected record into the record form whilst an alt-click will load the current full list into the form allowing you to step through them without returning to the list to select the next one. You can choose instead to reverse this function so that a simple click loads the full list and alt-click loads the single record.
6. Stored documents download option:
- download all - documents will be downloaded to your computer when you click the view button
- show all possible in browser - graphics file formats and pdfs will display in the browser, other file types will be downloaded
- show only images in browser - all other filetypes will be downloaded
7. New resource names lists show (only applies to users who can add resources i.e. managers, surveyors etc)
8. Standard hours in working day - used as the basis for calculating hours used for tasks etc
9. Working day start and end times - used in setting dialogs etc and for calculating working hours for calendar displays
10. List all courses (applies to training and qualifications management) - show all available courses, including those not currently subscribed to
11. Include supervisions in matrix (applies to training and qualifications management) - set to Yes to include internal supervisions and appraisals in matrix report outputs, otherwise set to No
12. Hide shared issues unless filtered - set to Yes in order to limit the issues displayed in Helpdesk lists to issues assigned to you directly (other issues can be located using the Find options)
13. Use step-thru process for new issues - set to Yes in order to use the step-thru screens for logging new Helpdesk issues rather than the full form (full form can still be used by switching to it when required)
14. Resource drop-downs display - set the preferred option for how resources lists drop down selections are displayed
15. Resource lists sorted by - in addition to display option in (12) you can separately decide how you would prefer the resources lists to be sorted: by name or by reference.
16. Max rows limit in default lists - specify the maximum number of rows (records) to display by default when viewing lists of records (more records can always be found by using the Find / Filter options)
Messaging tab
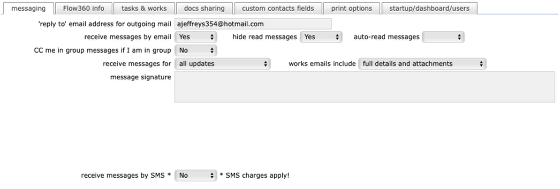
On this tab you can set up the defaults for messaging:
- The 'reply to' email address will be set as the ReplyTo address on all emails that you send from within Flow360;
- Receive messages by email option - set to Yes if you want all messages to you also sent by email to primary email address (this is set up on your personal 'Home' contact card);
- Receive messages for - set to major updates only to limit automatic notifications to major status changes only (default); set to all updates to also received notifications for more minor changes e.g. to issue priority or a change of target date or assignment.
- Hide read messages option - set to Yes to automatically hide read messages in your messages lists (this is also the default)
- Auto-read messages option can only be set if you have the receive messages by email option turned on. If you turn this option on then once a messages has been successfully sent to you by email the matching message in Flow360 will be auto-marked as having been read. You are advised to USE WITH CARE and make sure that you will monitor your emails for Flow360 communications!
- The message signature field allows you to set up a default signature to be added to messages you send from Flow360.
- Receive messages by SMS - set to Yes if you want to also receive all messages by SMS (text message) to your primary mobile phone number (this is set up on your personal 'Home' contact card);
NOTE: There will be a charge made for messages sent by SMS. Flow360 passes this charge on directly to the client of the relevant resources
Custom contacts fields tab

On this tab you can set up additional labels and data types that you would like to use on your own or others contacts cards. This information is only ever visible to you - each user of Flow360 can have their own independent (and completely private) sets of custom data that they can use on any contact cards that they have access to.
Tasks & works

The tasks & works tab governs task displays, including settings for when warning flashes are triggered for tasks, helpdesk issues and works items.
- By default display tasks / helpdesk & works for next... - set the default interval to use when first showing a new tasks, helpdesk issues or works lists. For day to day use you may only want to made aware of tasks/issues/works that are due say in the next 3 or 6 months, so set this option accordingly. This does not limit your ability to use the filters to find records that fall outside of this range of course!
- Initially omit helpdesk and works without targets - set this to Yes to only show issues that have specified targets when first showing the list - use the filters to find other records.
- Include by default in tasks tab list - this affects which tasks are listed by default when you view the tasks tab list at any resource level. Set to inactive tasks to omit from the displayed list any tasks that are already active on an works order. Set to all tasks to include these active tasks by default. (Using the filters to search for specific sets of records overrides this setting).
- Combined Helpdesk and works list shows - this setting allow you to control how the 'My tasks and works' list displays records. In order to display all Helpdesk issues and all works orders/enquiries etc, even where they overlap (i.e. the works order relates to a Helpdesk issue), set to show all with overlaps. To show only Helpdesk issues without linked orders and all orders including those linked to Helpdesk issues, set to omit overlaps, favour works (this is the generally recommended option). To show only works that are NOT linked to Helpdesk issues and all Helpdesk issues including those linked to works orders, set to omit overlaps, favour helpdesk.
- Set yellow warning for tasks - this is the point at which a task has a yellow flash.
- Set amber alert for tasks- this is the point at which a task has an orange flash.
- Set yellow warning for helpdesk & works - this is the point at which a works item or a helpdesk issue has a yellow flash.
- Set amber alert for helpdesk & works - this is the point at which a works item or helpdesk issue has an orange flash.
- Calculate task costs in lists - it is advised to set this to No for general use. When set to Yes, a recalculation of task one-off and repeat costs will occur every time a tasks list os shown and this can lead to slow performance. You can always use the filters to find task costs and projections when you need to.
- Calculate tasks costs options - The option to use when calculating repeat task costs for reports and projections. Set to most recent to use the most recent repetition prior to the start of the date range in question (this is the default and most accurate option). Set to task start date if you want to ignore any executions to date in order to calculate a 'clean' projection of tasks costs from a start date.
Flow360 tab
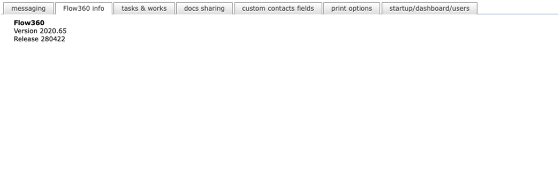
Displays the current information about the Flow360 solution
Docs sharing tab
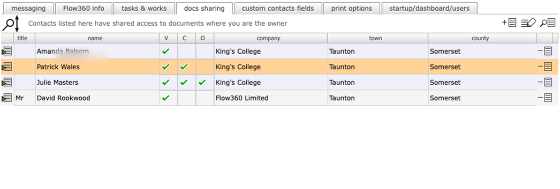
The docs sharing tab allows you to specify others who will share access to documents you upload to Flow360. See lesson on docs sharing for more information.
Print options tab
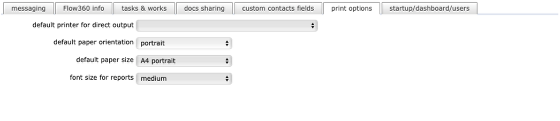
The print options tab allows to set up defaults for report outputs and to select a default printer if there is one available on your system.
Main start options
Start screen layout
You can choose what start screen layout you prefer:
- simple - displays up to 3 main buttons arranged vertically, plus mini buttons for Log out, Preferences, Messages, Home and Help
- standard - displays up to 9 main buttons arranged in a circle, plus mini buttons as above
- pro - displays up to 12 main buttons in a grid, plus mini buttons as above
Depending on your user account, one of these options will be set automatically when you first log in. If you make changes you must log out and log back in again for the changes to take effect.
Start screen buttons
You can choose to set up the main start screen with you preferred set of buttons rather than the default ones. Use the selectors to choose which button you want in each of positions 1-9. You do not have to set any minimum number - if you only want 1 button that is fine!
IMPORTANT: to have the custom setup used, make sure you also check the 'use custom buttons' option! You must log out and log back in again to have these changes take effect.
Startup status message options
Choose if and when the status message shows - this gives notification of upcoming and overdue scheduled tasks, works items, helpdesk issues as well as qualification expiry and renewals. You can also choose the priority level/s to include in the message counts and in the dashboard chart statistics.
NOTE: It is also possible to trigger the status messages manually from the main start screen using the mini status gauge button.
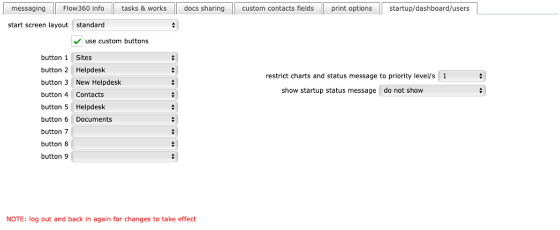
Startup/dashboard/users tab
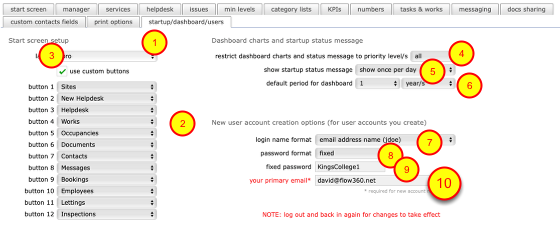
The startup/dashboard/users allows all users to specify their preferred (personal) start screen button setup, preferred options for the dashboard charts and startup status message and (for managers and others who can create new user accounts for others) the options to use when creating new user accounts.
- Select the preferred (personal) start screen layout from simple (max 3 buttons vertically), standard (max 9 buttons in a circle around the main logo), pro (max 12 buttons in a grid).
- Select the preferred button for each of up to 12 options (depending on layout selected in (1))
- Tick the use custom buttons option to use your specified preferred layout and log out and back in again to see the changes.
- restrict dashboard charts and status message to priority level/s - specify the maximum priority level to include in statistics for both the dashboard charts and in the status message dialog
- show startup status message - choose when and if to display a startup status panel listing: due and overdue tasks, due and overdue works, due and overdue Helpdesk issues, inspections with fails, qualifications due to expire to be renewed. The options available to any one user will depend on their user type when logged in (e.g. manager / general user / service provider etc). Choose also what level of priority (for tasks/works and helpdesk issues) to include in the status message.
- default period for dashboard - set the time period to use by default for charts based on historical data (ie inspections)
IMPORTANT: to have the custom setup used, make sure you also check the 'use custom buttons' option! You must log out and log back in again to have these changes take effect.
New user account creation options (only available to users who can create user accounts for others)
7. Specify the login name format to use for new user accounts
8. Specify the password format (fixed or auto-generated)
9. If the password format is fixed, specify what the fixed password is to be (users will have to set their own password on first login)
10. Also ensure your own primary email address is specified in the your primary email field. This is the same field as your primary email address on the comms tab on your personal contact record but is repeated here for ease of checking.