Setting up Manager preferences
In addition to the standard user preferences (see Setting up Standard User Preferences) managers have a few other things they can set up on their Manager preferences card.
Start screen tab (Primary manager preferences)
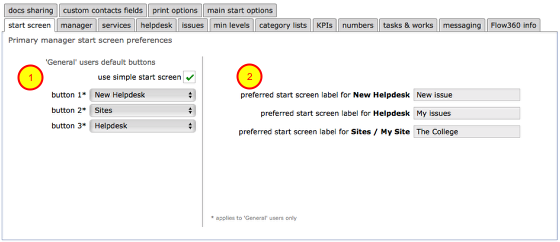
The start screen tab preferences allow the primary manager on a site to set some defaults for other users.
'General' users default buttons on the main start screen.
1. You can specify the default setup for General users to use:
- the simple start screen (max 3 main buttons arranged vertically) - tick the use simple start screen option and select the required option for each button from the drop down menus.
- the standard start screen (max 9 buttons in a circle around the main logo) - untick the use simple start screen option and select the required option for each button from the drop down menus.
2. You can specify alternative text labels for the New Helpdesk, Helpdesk and Sites / My Site buttons. Edit the text fields as required.
Manager tab (Manager and Primary manager preferences)
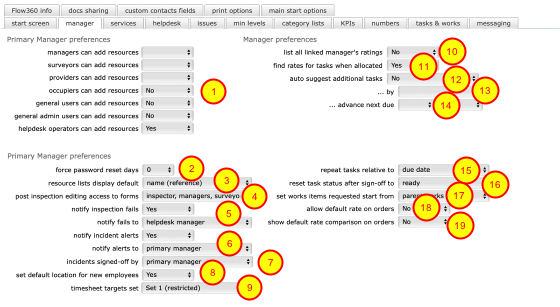
This tab is for Primary managers only and affects global settings for all users on all sites where they are the primary manager on the personnel tab on the main site record.
- Occupiers/general users/general admin/helpdesk users can add resources - set to Yes to allow the appropriate group of users to add new resources to locations when logging a new helpdesk issue. If this is set to No, then the option for 'Other' will not show on the drop down valuelists when selecting the object in a location that a new helpdesk issue relates to.
- Force password reset days - set the number of days after which users on your site will be forced to set a new password (primary manager)
- Resource lists display default - specify how resource lists (i.e. in helpdesk issue drop down selectors) are displayed, to include name and / or reference
- Post inspection editing access to forms. Specify the set of users that have edit privileges for inspections forms.
- Notify inspection fails - set to 'yes' to trigger an automatic message to either the primary site manager or the helpdesk manager whenever an inspection items registers a fail (set the message target in the notify fails to setting
- Notify incident alerts - set to 'yes' to trigger an automatic message to either the primary site manager or the helpdesk manager whenever an incident has an alert (set the message target in the notify fails to setting
- Incidents signed off by - select who can have responsibility for signing-off incident reports as closed
- Set default location for new employees - set this to Yes in order that new employees are automatically assigned a default (site level) location when their employee record is created
- Timesheet targets set - control which personnel are listed for selection when creating new timesheets records: Set 1 (restricted) - only personnel directly involved in the current issue or works etc will be listed; Set 2 (organisation) - all of set 1 plus all other internal employees who hold work remits or are part of an internal team; Set 3 (extended) - all of sets 1 and 2 plus external service providers and contractors with remits.
- List all manager's ratings. The default is 'No'. If set to 'Yes' then all linked manager's ratings (KPIs) will be available to add to works orders. If set to 'No' then only those ratings for the manager who issued the enquiry or order will be available.
- Find rates for tasks when allocated. The default is 'Yes'. If set to 'No' then no rates will be located when new tasks are added to the maintenance schedule.
- Auto suggest additional tasks. If set to 'Yes' then every time a new enquiry or order is created, any other tasks of the same work-types on the same sites will also be added to the list for possible selection and inclusion in the enquiry or order. This is useful when a reactive maintenance item comes up and there are other scheduled items of similar type due soon at the same site. Including the other items in the order will help minimise costs.
- ... by worktype, category only or category and subcategory - selection criteria relating to (13) above. If set to worktype or category only, then potentially a wider set of related tasks will be found for possible inclusion.
- ... advance next due - how far ahead to look when suggesting additional task in relation to (13) above.
- Repeat tasks relative to - set how repeating tasks next due dates are calculated - from original start date (retains fixed sequence regardless of when signed-off) or from most recent sign-off date
- Reset task status after sign-off to - Set to ready to automatically reset tasks that will still repeat to ready once signed-off. Set to signed-off to have them remain as signed-off for reference purposes and checking before manual reassignment to ready status.
- Set works items requested start from option. The default is 'task next due'. When set to this, all works items will have their requested start date set as the next due date for the relevant scheduled task. If set to 'parent works' then all works items in an order or enquiry will share the requested start date set up for the parent works record.
- Allow default rate on orders - set to Yes to put the default rate on orders where a rate from the relevant provider is not available (leaving this set to No will result in orders being issued with a zero rate is no relevant provider rate can be located)
- Show default rate comparison on orders - set to Yes to show the default rate on work order cards when viewed by service providers (managers will always see this comparison rate). Set to No to hide this rate from view.
Services tab (Service manager preferences)
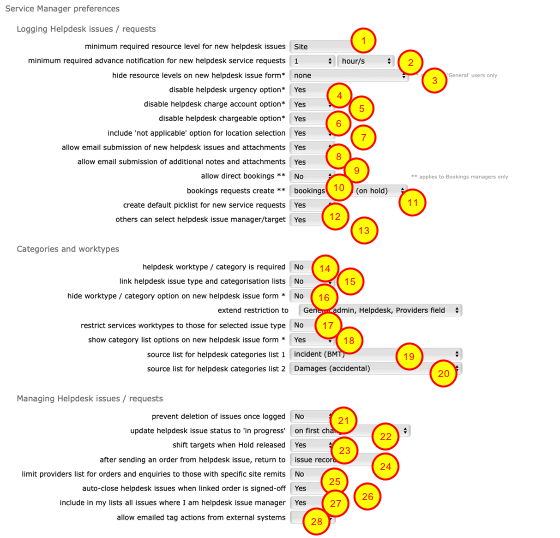
This tab is for the primary premises manager and all service area managers and affects global settings for all users on all sites where they are the primary manager or a specified service area manager on the personnel tab on the main site record.
The primary manager will be the default service area manager for all premises issues that are not specified services (ie catering, cleaning, housekeeping, booking, vehicle booking, general/portering, grounds, ICT(). The service area settings here will therefore apply for all premises issues where the manager is the primary premises manager. Where the manager is a specified service area manager, these settings apply to their service area issues only.
- Min required resource level for new Helpdesk issues. The primary manager can determine the minimum resource required for the logging of new Helpdesk issues. For example is you set Item here then anyone logging issues on your sites will have to specify an object in a room location (or similar) in order to log a new issue. If you set Asset then only a building needs to be specified. Consider carefully what level you require here! IMPORTANT NOTE: There is also finer grained control possible for these minimum levels by using the "min levels" tab (see below).
- Minimum required advance notification for new Helpdesk service requests. Set the required minimum notification - requests that are logged with dates that do not fulfill these requirements will be blocked.
- Hide resource levels on new Helpdesk issue form. You can select which levels are hidden by default for General users only. Select from 'items and components', 'components', 'none'.
- Disable Helpdesk urgency option. This applies to General users only - enable or disable the urgency option when users log new Helpdesk fault reports (does not apply to service requests where a date is often required).
- Disable Helpdesk charge account option. This applies to General users only - enable or disable the charge account option when logging new Helpdesk issues (Managers and above always have this option).
- Disable Helpdesk chargeable option. This applies to General users only - enable or disable the chargeable option when logging new Helpdesk issues (Managers and above always have this option).
- Include 'not applicable' option for location selection. Set to Yes to allow users to not have to specify a precise location for a new Helpdesk fault report / service request by ticking a 'not applicable' box when adding an issue. This can be useful for general requests that are not really location specific (i.e. a training or general systems setup request).
- Allow email submission of helpdesk issues (to helpdesk@flow360.net) - Set to Yes to allow registered staff on your site/s to submit new Helpdesk issues by email using a standard template. IMPORTANT NOTE: using email submissions bypasses the location selection lists and display of currently open issues to avoid duplication. This option is therefore not generally recommended!
- Allow email submission of notes (to helpdesk@flow360.net.) - Set to Yes to allow registered staff on your site/s to submit note additions by email for attaching to existing Helpdesk issues or works orders and enquiries.
- Allow direct bookings. If set to Yes then all staff can create a booking directly from the Helpdesk new booking service request form without requiring the bookings team or manager to confirm the booking first. Generally it is recommended that all bookings go through a manager or team first.
- Bookings requests create. Choose how new bookings service requests are handled when NOT direct bookings: bookings records (on hold) - this option creates the full set of bookings options as distinct service requests and then puts them on hold waiting for a bookings manager or team and the various service managers to confirm that the request is possible prior to full confirmation and the booking going live (this is the recommended option); single combined request - this option pulls all the bookings request elements together into the details field of a new bookings service request. In order to finally confirm and create the booking the full set of services will need to be created afresh by the bookings manager or team.
- Create default picklist for new service requests. If set to Yes the default service items specified on the site record standard tasks tab for the relevant service area will be displayed as a picklist for user selection when making a new service request.
- Others can select Helpdesk issue manager/target. Set to Yes to allow all users on your site/s to select for themselves which manager a particular Helpdesk issue should be directed to. Set to No to use the default Helpdesk manager/s. Note: additional settings on the employee team records can make specific individuals available for selection.
- Helpdesk worktype / category is required - Set to Yes to make the selection of worktype / category mandatory (prevents logging of new issue/request without this selection)
- Link helpdesk issue type and categorisation lists - Set to Yes to replace the worktype and category list 1 and 2 options with hierarchical categorisation lists set up in Manager preferences by service area manager
- Hide worktype / category option on new helpdesk issue form - Applies to General users only. Cannot be set to Yes if issue type is linked to categorisation lists (15)
- Restrict service worktypes to those for selected issue type - When set and a user selects ICT Services as the issue type for example, then ONLY worktypes specific to ICT Services will be available for selection in the worktypes drop down on the new Helpdesk issue form. Does not apply if issue type is linked to categorisation lists (15).
- Show category list option on new helpdesk issue form - Applies to General users only - allow users to specify the list to add this issue to. Does not apply if issue type is linked to categorisation lists (15).
- Source list for Helpdesk categories 1 - choose a categorisation list to be available for categorising helpdesk issues using the category / list 1 option (you can set up your own lists on the category lists tab) Does not apply if issue type is linked to categorisation lists (15).
- Source list for Helpdesk categories 2 - choose a categorisation list to be available for categorising helpdesk issues using the category / list 2 option (you can set up your own lists on the category lists tab) Does not apply if issue type is linked to categorisation lists (15).
- Prevent deletion of issues once logged. Set this to Yes to prevent helpdesk issues from being deleted once logged. Otherwise they can be deleted if added in error for example but only up to the point where they have a history of events.
- Update Helpdesk issue status to 'in progress' - decide when the Helpdesk issue status should be updated from 'open' to 'in progress'. Choose from 'on first change' (ie when anything is changed in relation to the issue) or 'manually / on first instruction' (issue will remain 'open' until manually updated or a works order is created).
- Shift targets when Hold released - set this to Yes to automatically shift completion or target dates when an applied Hold is released. For example, if the hold was in place for 7 days, then the target date/s will be shifted by 7 days also to accommodate the Hold.
- After Helpdesk send order, return to - set to issue record in order to return to the Helpdesk issue record after creation of a works order using the Send button. Otherwise, set to Start screen.
- Limit providers to site remits - this governs which service providers (in-house or external) are proposed by Flow360 for new enquiries or orders. Set this to Yes to ONLY include providers that have site specific remits rather than client remits.
- Auto close Helpdesk issues. Set this to Yes to automatically set Helpdesk issues to Closed when the last task or works item is indicated as signed-off. If this is set to No then helpdesk issues need to be manually closed by the person in charge.
- Include in my lists all issues where I am helpdesk issue manager - set to 'Yes' in order to ensure that all issues where you are the designated Helpdesk issue manager will show in your active issues list, even if you not a) the person in charge or b) part of the assigned team.
- Allow emailed tag actions from external systems - set to Yes to allow email responses triggered from external systems to include tag actions such as #close. If not specifically set to Yes these actions will be blocked.
Helpdesk tab (Primary Manager Helpdesk preferences)
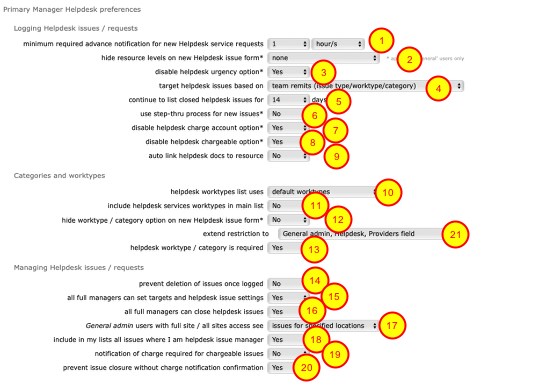
- Minimum required advance notification for new Helpdesk service requests. Set the required minimum notification - requests that are logged with dates that do not fulfill these requirements will be blocked.
- Hide resource levels on new Helpdesk issue form - (applies to General users ONLY) do not show the component or the item and component levels on the new Helpdesk issue when users are logging a new issue
- Disable Helpdesk urgency option - (applies to General users ONLY) set to Yes to hide the target date and time options (ie the urgency or priority) when users are adding a new issue
- Target Helpdesk issues based on - decide how issues are targeted, based on the entered service issue type and manager or based on team remits where available. The team remits targeting links to the team worktype remits that are set up for workforce teams. See separate lesson under the employee teams section for more details on team remits.
- Continue to list closed issues for - specify how long you would like issues that have been already closed to still be shown int he list of active and recently closed issue when users are logging a new issue or request. Continuing to list recently closed issues can help reduce duplication.
- Use step-thru process for new issues. This applies to General users only - set the default process for logging new Helpdesk issues to be the step-thru process rather than the full screen form. Users can toggle this for themselves at any time.
- Disable Helpdesk charge account option - (applies to General users ONLY) set to Yes to hide the option to select a charge account to counter charge an issue to when logging a new Helpdesk issue
- Disable Helpdesk chargeable option - (applies to General users ONLY) set to Yes to hide the option to indicate that an issue or request is chargeable when logging a new Helpdesk issue (the chargeable option can be set independently of the charge account selection or in conjunction with it).
- Auto link Helpdesk docs to resource - if you wish documents attached to incoming Helpdesk issues and requests to be auto-linked to the relevant resource (i.e. room or object), then set to Yes. Otherwise set to No to ensure that documents will be linked to the issue or request but not also linked to the resource or object that the issue relates to.
- Helpdesk worktypes list uses - the worktypes list visible when logging a new helpdesk issue or request can be based on a standard Flow360 set or built dynamically from the worktype remits of the various workforce teams. By basing the list on the team remits you can effectively limit the choices available to those that will match with one of your teams.
- Include Helpdesk services worktypes in main list - set this to Yes in order to include all standard services (i.e. catering, IT, grounds, housekeeping etc) as selectable options in the worktypes list. This is in addition to them being listed as main issue types. If they are listed and selected by a user then the main issue type will generally switch to match.
- Hide worktype option on new Helpdesk issue form. Set to Yes to hide the worktype selection list when logging a new issue (worktypes are often used as part of the targeting process so will be required in some cases).
- Helpdesk worktype / category is required - set to Yes to ensure that a new Helpdesk issue or request cannot be logged until the appropriate worktype has been selected. If left on No then the worktype is optional. If you are targeting issues based on both issue type and worktype you may well want this set to Yes.
- Prevent deletion of issues once logged. Set this to Yes to prevent helpdesk issues from being deleted once logged. Otherwise they can be deleted if added in error for example but only up to the point where they have a history of events.
- All full managers can set targets and Helpdesk issue settings - set to Yes to enable all full access managers (those with a tick in the F column on the personnel tab on the main site record) to change targets and adjust other helpdesk issue settings even where they are not the assigned person in charge.
- All full managers can close Helpdesk issues - set to Yes to enable all full access managers (those with a tick in the F column on the personnel tab on the main site record) to close helpdesk issues even where they are not the assigned person in charge.
- General admin users with full site / all sites access see - this setting allows you to control the visibility (and therefore also the access) that General admin users have to issues linked to the buildings and other parts of the site. If set to all issues on site then they will see all Helpdesk issues for the entire site but if set to issues for specified locations only then they will only see issues that relate to the parts of the site that their user locations give them access to.
- Include in my lists all issues where I am helpdesk issue manager - set to 'Yes' in order to ensure that all issues where you are the designated Helpdesk issue manager will show in your active issues list, even if you not a) the person in charge or b) part of the assigned team.
- Notification of charge required for chargeable issues - if set to Yes, the 'notification required' tickbox will display on Helpdesk issue records that have been flagged as chargeable
- Prevent issue closure without charge notification confirmation - if set to Yes, issues that have been flagged as chargeable and requiring a charge notification to be sent cannot be closed until the sending of a charge notification has been confirmed and logged as an event.
- Extend restriction to - you can choose to extend the restriction set in point 12 to include higher levels of users. By default this restriction applies only to General users (typically faculty staff or other general site users).
Issues tab (applies to primary manager only)

As a primary manager you can specify which Helpdesk issue types are available to users on your site. The list on the left (initially empty) is you preferred list of options. The list on the right is the standard Flow360 default set which will be used if you do not add choices to your preferred list.
- To add a system default to your default list click the target button on the appropriate row.
- To remove an option from your default list click the delete button on the appropriate row.
- You can specify which of your default choices will be the one set by default when a user starts logging a new Helpdesk issue - click in the left-most column to set the default item.
- Customise options for a specific premises type issue - the dialog allows you to set the default worktype for an issue type, optionally locking the worktype to prevent re-selection. You can also specify whether date fields are shown and if so which and also set which user types see these options.
Customising options for a specific (non-service area) issue type
Click the edit button on the relevant row for a non-service issue type in order to set specific default options when that issue type is selected for a new Helpdesk issue.
Custom options dialog
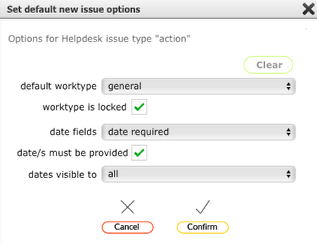
In the customise dialog you can:
- Set the default worktype that is auto-selected when this issue type (in this case 'action') is selected for a new Helpdesk issue
- Specify that the auto-set worktype is locked or not (if ticked, then users will not be able to select a different worktype for this issue type)
- Specify the date fields that need to be available for this option
- Specify whether only managers see the date options or all users
Make the relevant selections and click Confirm to save.
Min levels tab

The min levels tab gives you much greater and fine grained control over the minimum resource levels that need to be entered when logging new Helpdesk issues / requests.
You can specify the minimum required level for any specified issue type and worktype, or even for an issue type and a worktype combined.
Taking the above example row by row:
- Issues logged for King's College with an issue type of 'new installation' and work type of 'electrical' must have at least the Zone level identified;
- Any external works (any client, any site) need the Asset level identified;
- General service issues need the Zone identified;
- Failure issues on the King's College site need the Area level identified;
- Catering services at King's College need the Area level identified;
- Grounds service issues (any client, any site) need the Zone level identified.
In determining which manager's settings are used - if there is an identified manager for the issue type entered on the relevant site then that manager's settings are used. Otherwise the relevant Helpdesk manager's settings are used.
If no settings have been specified by any relevant manager then the global minimum level (for the issue type or generally) that is set on the general/helpdesk settings tab will be used.
Where no relevant manager settings can be found the default required level will be set as 'Area'.
To add a new requirement, click the Add button.
Adding a new minimum requirement

To add a new requirement for a specific issue type or work type or a combined issue type and work type make the appropriate selections and click the Confirm button.
You must enter either an issue type or a worktype and the minimum level required. Specifying the client and/or the site is optional, though generally recommended unless you are a manager working across multiple sites.
KPIs tab
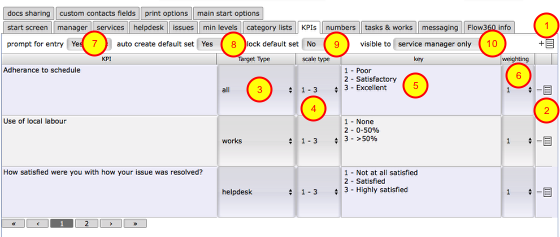
KPIs / ratings can be entered at various levels in Flow360. On the Manager preferences tab you can set up the KPIs that you want to record against works carried out by in-house or external service providers and contractors. These can be used a satisfaction survey questions that you can prompt users to complete when an issue or works is closed for example.
- Click the Add button to add a new line and then enter the appropriate text - these options will then show when you are adding KPIs to a specific works order for instance.
- Click the Delete button to remove an option. This will only affect future uses and will not change any KPIs that have already been logged using this label.
- Target type - specify whether this KPI / rating applies to Helpdesk issues, works or all.
- Scale type - specify the scale options that you wish to be available when using the this KPI / rating. Choose from 0-2, 1-3, 0-4, 1-5.
- Key - add text to guide users on what the scale points mean - this information will be visible to then when they add KPIs or ratings. When you change the scale type this field is reset accordingly.
- Weighting - Some individual KPIs / ratings may inherently carry more weight than others in determining an overall satisfaction or attainment percentage. The default is 1 but you can set the weighting higher for specific KPI / rating items if required.
- Prompt for entry - Set to Yes in order to prompt users to complete the KPIs / ratings questions when an issue or works is signed-off. This can also trigger additional text on messages that are sent on sign-off / completion.
- Auto create default set - Set to Yes in order to automatically create the default applicable set of KPI / rating items for the Helpdesk issue or works record when an issue or works is closed / signed-off.
- Lock default set - Set to Yes to prevent auto-generated KPI / rating items from being added to or deleted subsequently. This allows you to control which items are added and ensures consistency.
- Visible to - Choose who will be able to see the KPI / ratings tab and items on the Helpdesk issue or works record. Choose from: service manager only / all managers and above / all.
Add new KPI / rating option
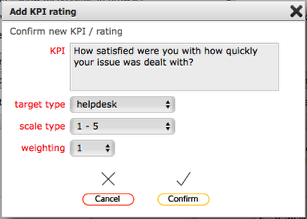
When you click the Add button you will see this dialog. Complete all items and click Confirm to save the item.
Add an 'Any other comment' option
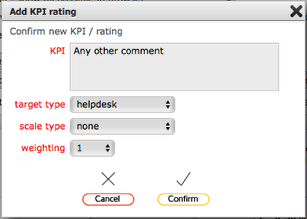
You can also add additional items that do not use a scale and are for extra comments or free text entry. These do not contribute to the overall percentage.
Complete the new item dialog in similar fashion to this (being sure to select 'none' as the scale type) and click Confirm to save.
Numbers tab
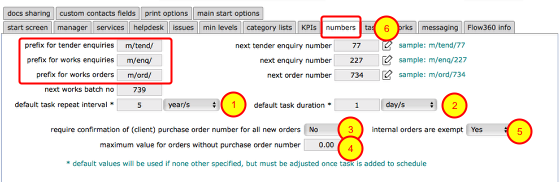
The numbers tab allows each manager independently to specify the text prefixes and number sequences to use for their own issued tender enquiries, enquiries, orders and batches. Where required, each manager can use their own set of prefixes in order to differentiate between orders issued by different managers.
The edit buttons at (6) allow you to specify a preferred number to use for the next tender enquiry, enquiry or order. Note that in order to prevent duplication of numbers for an individual manager you cannot select a number that is equal to or lower than the highest number already used!
Additional controls are:
- The default repeat interval to apply to new tasks where no other repeat or duration information is available
- The default task duration to apply to new tasks where no other repeat or duration information is available
- Set to Yes to require entry of a client purchase order number on the Flow360 order before the order can be issued. This is a very useful control to allow direct cross referencing of Flow360 orders to purchase orders in your financial management system (FMS)
- You can set a lower limit for the purchase order requirement detailed in (3) above. Orders with a total anticipated value that is lower then this figure will be exempt from the requirement for a client purchase order number. Set this limit to 0 to not allow any exemptions.
- Set to Yes to exempt internal orders (orders sent to internal maintenance or other site personnel) from the purchase order requirement.
Tasks & works tab

The tasks and works tab governs task displays, including settings for when warning flashes are triggered for tasks, helpdesk issues and works items.
- By default display tasks / helpdesk & works for next... - set the default interval to use when first showing a new tasks, helpdesk issues or works lists. For day to day use you may only want to made aware of tasks/issues/works that are due say in the next 3 or 6 months, so set this option accordingly. This does not limit your ability to use the filters to find records that fall outside of this range of course!
- Initially omit helpdesk and works without targets - set this to Yes to only show issues that have specified targets when first showing the list - use the filters to find other records.
- Include by default in tasks tab list - this affects which tasks are listed by default when you view the tasks tab list at any resource level. Set to inactive tasks to omit from the displayed list any tasks that are already active on an works order. Set to all tasks to include these active tasks by default. (Using the filters to search for specific sets of records overrides this setting).
- Combined Helpdesk and works list shows - this setting allow you to control how the 'My tasks and works' list displays records. In order to display all Helpdesk issues and all works orders/enquiries etc, even where they overlap (i.e. the works order relates to a Helpdesk issue), set to show all with overlaps. To show only Helpdesk issues without linked orders and all orders including those linked to Helpdesk issues, set to omit overlaps, favour works (this is the generally recommended option). To show only works that are NOT linked to Helpdesk issues and all Helpdesk issues including those linked to works orders, set to omit overlaps, favour helpdesk.
- Set yellow warning for tasks - this is the point at which a task has a yellow flash.
- Set amber alert for tasks- this is the point at which a task has an orange flash.
- Set yellow warning for helpdesk & works - this is the point at which a works item or a helpdesk issue has a yellow flash.
- Set amber alert for helpdesk & works - this is the point at which a works item or helpdesk issue has an orange flash.
- Calculate task costs in lists - it is advised to set this to No for general use. When set to Yes, a recalculation of task one-off and repeat costs will occur every time a tasks list os shown and this can lead to slow performance. You can always use the filters to find task costs and projections when you need to.
- Calculate tasks costs options - The option to use when calculating repeat task costs for reports and projections. Set to most recent to use the most recent repetition prior to the start of the date range in question (this is the default and most accurate option). Set to task start date if you want to ignore any executions to date in order to calculate a 'clean' projection of tasks costs from a start date.
- Inflate energy costs option - this is used to inflate energy costs specifically when reporting on resource running cost projections (typically for boilers say).
- Inflate task costs option - this is used to inflate task costs specifically when reporting on resource running cost projections.
Messaging tab - Standard texts on works orders
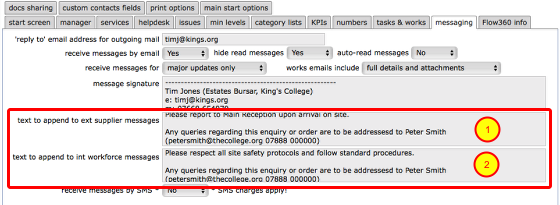
The messaging tab has additional options for managers to specify standard default text to be appended to all messages and emails containing details of works enquiries or orders.
There are 2 separate boxes, one to specify text that will be appended to enquiries and orders that go to external service providers and contractors (1) and one to specify text that will be appended to enquiries and orders that go to internal service providers and contractors / team members (2).
Additional information on the standard messaging preferences that apply for all users can be found here.
Messaging tab - Email submission domains, white and blacklists
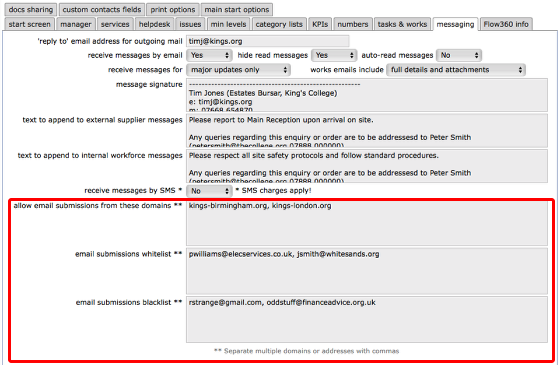
The 'messaging' tab on the Manager preferences has fields where you can specify entire domains that are allowed for email submissions in addition to a whitelist and blacklist for specific email addresses.
In each case, separate multiple domains or email addresses with commas as above.
• When you specify allowed domains, ANY email submission from the specified domains will be allowed.
• When you specify whitelisted email addresses, submissions from these addresses will be allowed.
• When you specify blacklisted email addresses, submissions from these addresses will be blocked.
In general, a blacklisted email address will be blocked, even if also whitelisted, so please check entries carefully!
Services tab - Email submission preferences
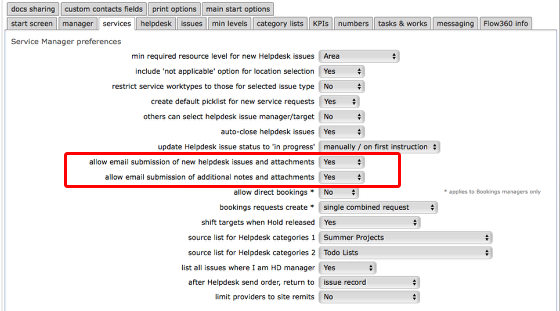
The 'services' tab in the Manager preferences has 2 settings that affect whether or not Helpdesk issues and/or note additions to issues or works are allowed by email:
• allow email submission of new helpdesk issues and attachments - set to Yes to enable submissions by email, No to disallow
• allow email submission of additional notes and attachments - set to Yes to enable submissions by email, No to disallow
NOTE: These settings are on the services tab because they can be set by each service area manager independently. Thus one service can allow email submissions whilst another might disallow them.
Category lists tab
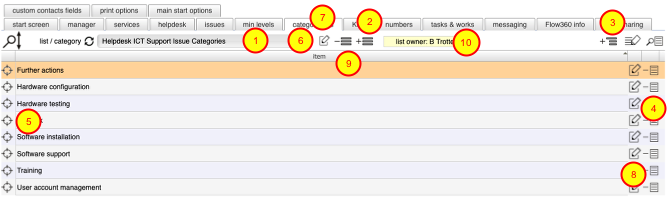
The category lists tab allows managers to review the built in categorisation lists in Flow360 and also to set up their own lists. These lists can then be used as the basis for any categorisation options set up on the categories tab that is visible on helpdesk issue record, task records, works items records, resources records, document records etc.
These lists can also be used as a categorisation scheme for helpdesk issues if the primary or service area manager specifies in their preferences that issue type is linked to categorisation lists.
- To view a categorisation list, select the list from the drop down selector
- To create a new list click the new list button
- To add an item to the current list and level, click the add item button
- To remove an item from a list click the delete item button
- To drill down a level click the target button
- To go up a level (assuming you have drilled down first!), click the up level button
- To rename the list click the edit button
- To edit an individual list item click the edit item button
- To delete a list you have created click the delete list button
- The name of the current list owner is shown (if no owner is identified then this is a standard Flow360 built-in list)
NOTE: You may only edit lists that you have created. You can view other lists (both the built in Flow360 lists and lists created by your colleagues) but you may not edit them.
Creating a categorisation list linked to a specified issue type (for helpdesk issues, tasks and works items)
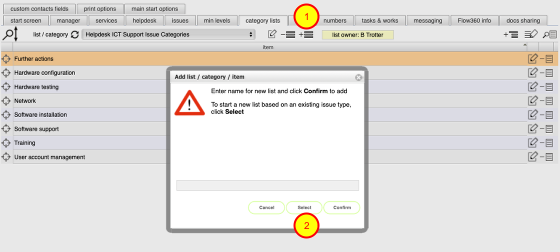
Categorisation lists linked to issue types can be used to formally categorise incoming and existing issues, tasks and works. To set one up:
- Click the add list button
- In the dialog, click the Select button
Select issue type to link new list to
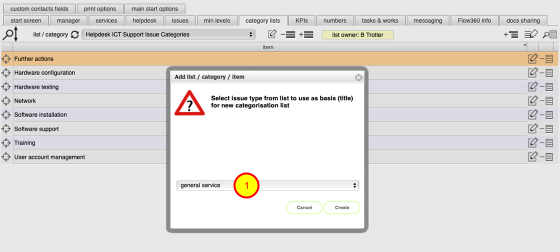
- Select the issue type you want to link this categorisation list
- Click Create
- Follow the steps above to add line items and new levels to your list
- IMPORTANT: If you are the premises manager or a services area manager and you want to use this linked list for the specified issue type, then you need to set your manager preferences to link issue type with categorisation lists!
Set manager preference to link issue types to category lists
In order to use the categorisation list you have set up, linked to a selected issue type, set the manager preference on the 'services' tab in your preferences as here.
New helpdesk issue with linked categorisations in use
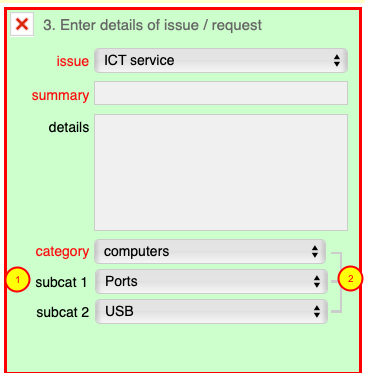
- If linked categories are in use the green section of the helpdesk form will display as above with the worktype option replaced by category and separate category 1 and 2 list options replaced by subcat1 and subcat2.
- The link graphic confirms that the category lists are linked for this issue.
Helpdesk issue record with linked categorisations in use
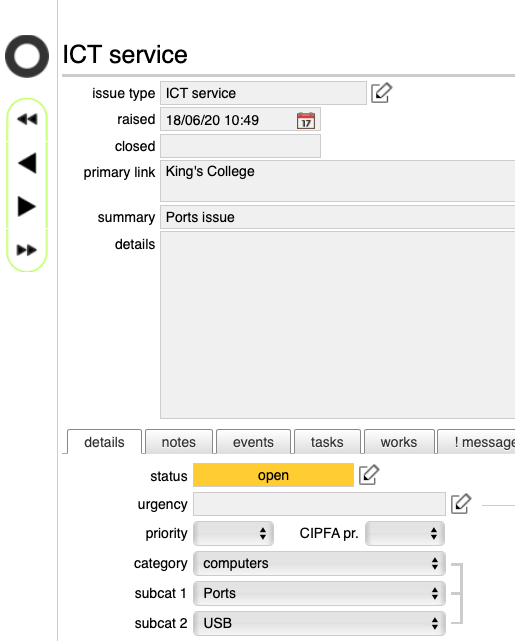
Where linked categorisation lists are in use the helpdesk issue record will also display category, subcat1 and subcat 2 in place of worktype. category / list 1 and category / list 2.
Startup/dashboard/users tab
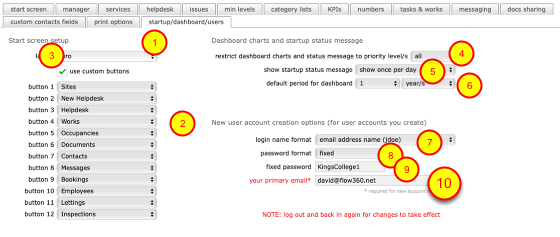
The startup/dashboard/users allows all users to specify their preferred (personal) start screen button setup and (for managers and others who can create new user accounts for others) the options to use when creating new user accounts.
- Select the preferred (personal) start screen layout from simple (max 3 buttons vertically), standard (max 9 buttons in a circle around the main logo), pro (max 12 buttons in a grid).
- Select the preferred button for each of up to 12 options (depending on layout selected in (1))
- Tick the use custom buttons option to use your specified preferred layout and log out and back in again to see the changes.
- restrict dashboard charts and status message to priority level/s - specify the maximum priority level to include in statistics for both the dashboard charts and in the status message dialog
- show startup status message - choose when and if to display a startup status panel listing: due and overdue tasks, due and overdue works, due and overdue Helpdesk issues, inspections with fails, qualifications due to expire to be renewed. The options available to any one user will depend on their user type when logged in (e.g. manager / general user / service provider etc). Choose also what level of priority (for tasks/works and helpdesk issues) to include in the status message.
- default period for dashboard - set the time period to use by default for charts based on historical data (ie inspections)
New user account creation options (only available to users who can create user accounts for others)
5. Specify the login name format to use for new user accounts
6. Specify the password format (fixed or auto-generated)
7. If the password format is fixed, specify what the fixed password is to be (users will have to set their own password on first login)
8. Also ensure your own primary email address is specified in the your primary email field. This is the same field as your primary email address on the comms tab on your personal contact record but is repeated here for ease of checking.