Add sub resources
Populating your sites with assets and their contents
Introduction
All sub-resources are added in the same way - click the Add button at the top of the list to add a sub-resource, fill in the details on the New Resource form and click Confirm (or click New to save and create another). Alternatively you can click the New button at the top right of any resource card to add another resource at the same level as the current resource card. (more on this below)
Add a section to a site
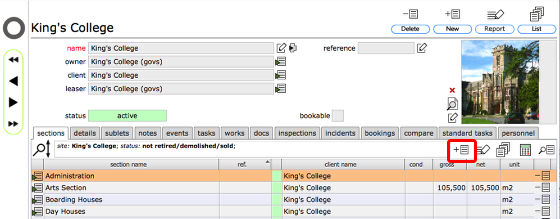
Sites are divided into one or more Sections. To add a Section to a Site click the the Add button at the top of the list of Sections.
Enter new section information
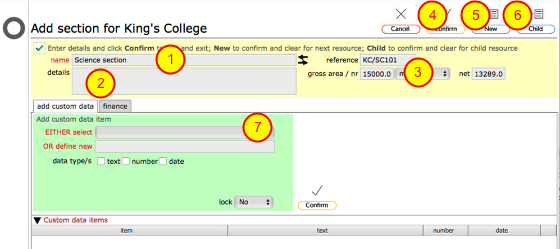
In the Create resource form enter the new section name (1), and optionally enter details (2) and gross / net areas (3). Click Confirm (4) to finish adding Sections or New (5) to save this section and add another. Click the Child (6) button to confirm this section and proceed to add an asset such as a building or area of grounds.
From this form you can also add any custom data that you wish to store relating to this section. Use the 'add custom data' (7) section to enter the details of any custom data items you wish to add that relate to this resource. (see the section on custom data for more information on adding custom data to resources)
Add assets to a section
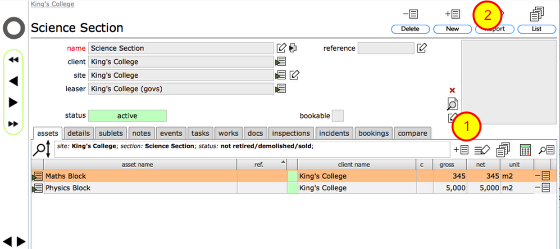
Assets are added to Sections in the same way as Sections are added to Sites. Simply click the Add button and name the new Asset. When adding resources it is also possible to use the New button on any resource card to create another resource at the same level or click the Child button to confirm the current resource and proceed to one or more children to it, for instance add a series of rooms to a floor. In the above screen shot, clicking the New button marked (1) will add a new Asset to the Student Housing Section whilst clicking the New button marked (2) will add a new Section to the King's College Site.
Populating the rest of the site
Adding further sub-resource levels is accomplished in the same way, all the way down to component elements of items in rooms. Of course you do not have to go down to this level of detail - but the more comprehensive your database is, the better your management information, history and audit trail will be.
Once you get down to Item and Component level there are additional details you can enter - see the Section on adding Items and Components for more details.
Adding vehicles
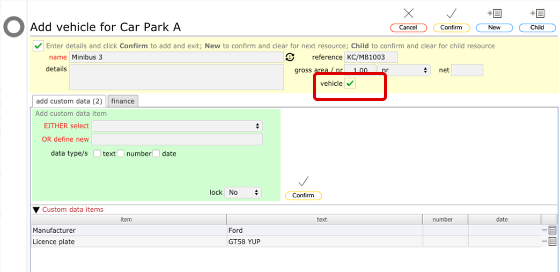
Vehicles are added at the 'areas' level from the 'vehicles' tab. Typically you might add 'Garages' as an asset, then ground floor as a zone. When you view the ground floor record you will see the 'vehicles' tab. Click the add resource button on this tab to add a new vehicle.
When you do this, the vehicle tickbox is preset on the new resource form.
Changing the vehicle setting for an 'area'

When you view the resource record for a vehicle the vehicle tickbox should be checked. You can toggle this setting at any time to identify a vehicle.
NOTE: Vehicles will be listed under the vehicles tab on the relevant zone whereas areas (e.g. rooms) are listed on the areas tab.
Navigating the resource path

As you add resources and drill further down into your site you will notice a breadcrumb trail building up at the top of the screen - this will allow you to jump back up to any location along the current path just by clicking the name of the relevant object in the trail.