The New Booking Form
How to use the booking / booking request form
Helpdesk card - bookings service
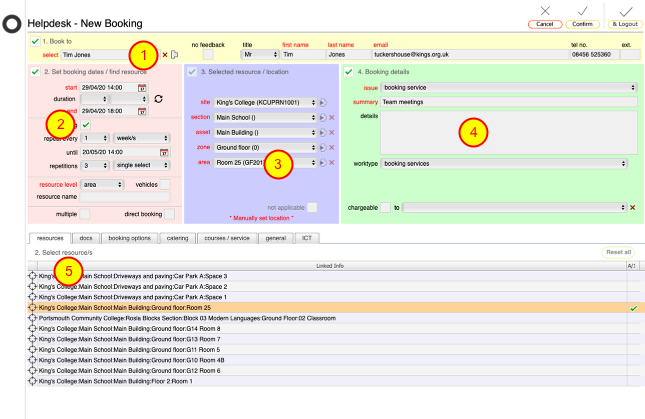
Bookings are added using a variation of the standard Helpdesk request form.
There are 5 main sections to the form:
- Yellow section - the name and contact details of the person the booking is for
- Pink section - the dates, times and repetitions of the booking
- Blue section - the resource restrictions / selected location/s
- Green section - the booking summary and outline details
- Additional tabs for resource selection, linked documents, catering, portering and services requests
Process overview
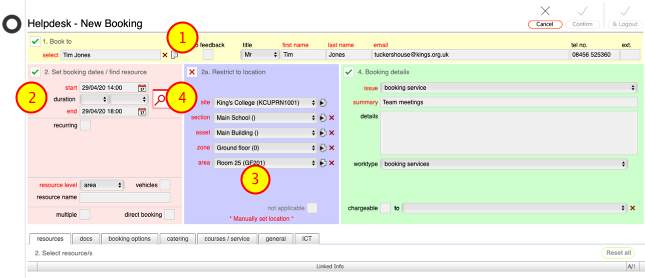
The basic steps for entering options to get a list of bookable resources:
- Confirm caller (bookee) name in yellow section
- Set date and repeat options in pink section (NOTE: the repeat options will only show if you tick the recurring option)
- Restrict location choices if required in blue section
- Click Find button in pink section to get list of resources available
To confirm a choice of booking:
- Select resources to book on the resources tab
- Add selections for catering, portering etc in the additional tabs (optional)
- Upload or link relevant documents on the docs tab (optional)
- Click the main Confirm button to register the booking (or booking request)
Confirm name on booking
In the yellow section, confirm the name of the person the booking is for.
If you are logged in as a manager (or some other users with higher level clearances) you can select the name.
If you are logged in as a general user your name will be pre-filled and this is non-editable.
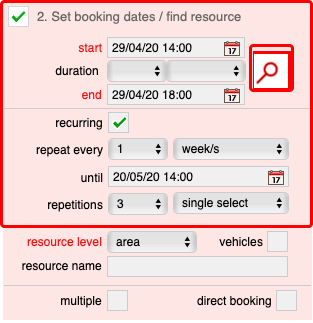
Set dates and repeats
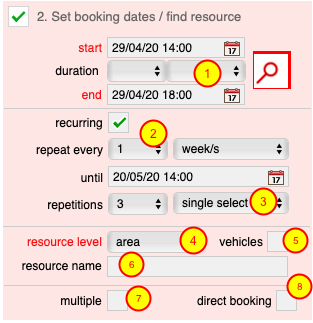
- In the pink section, set the start and end dates of the required booking (1)
- If this is to be a repeat booking, tick the recurring option and then set the repeat interval and number of repeats (i.e. for 6 bookings in total set the repeats to 5)
- By default repeat bookings allow for a single selection to cover all repeat dates. If you are booking 10 or fewer repeats you can also choose to use a grid selection option to choose different resources for each date.
- By default the resource level to be booked is pre-set to 'area' (i.e. a room or similar). Change this if you need to.
- You can limit the search options to only include vehicles by ticking this box (will be automatically set when initiated from a vehicle record)
- You can limit the search to a specific named location by entering part of the name in the resource name field.
- If you need to book multiple resources per date (i.e. more than 1 room), click the multiple option.
- If this is a direct booking (made by a bookings manager for example) then the direct booking box will be ticked. If you are a manager with the right clearance you may be able to set this option directly here.
NOTE: It is only essential to set the start and end dates and times and the resource level. All other settings are optional - use them where required.
Example pink section for simple booking
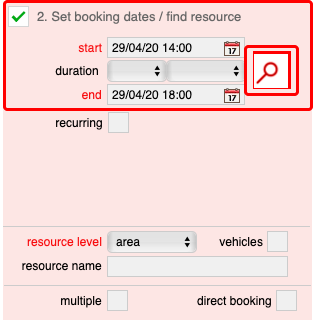
For a simple booking you only need to set the start and end dates / times, then click the Find button to locate available resources for the entered dates and times.
NOTES:
The find button will only show when options have been set!
Direct bookings can only be made by a bookings manage or where the bookings manager allows direct bookings made by others
Simple booking search result
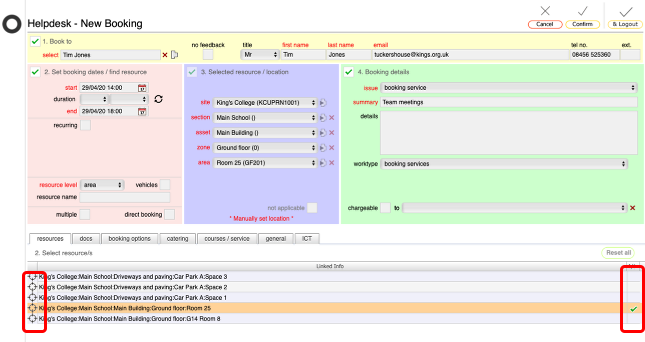
For a simple single date booking search the available resources are listed on the resources tab. To select a room, either click the target button on the left or click in the selection box on the right of the relevant row.
As this is a simple single booking, only 1 location can be selected!
Simple booking search result with works clashes

If there are known clashes with already scheduled works for any of the potentially bookable resources/locations, an exclamation mark will show in the selection tick box on the right for the affected row/s.
It is still possible to select the resource for the booking but an alert will show confirming that there are scheduled works for that location, date and time.
Example pink section for repeat booking
In this example there will be 4 bookings in total - the master plus 3 repeats.
Click the Find button to locate available resources for the entered dates and times.
Repeat booking result (single select)
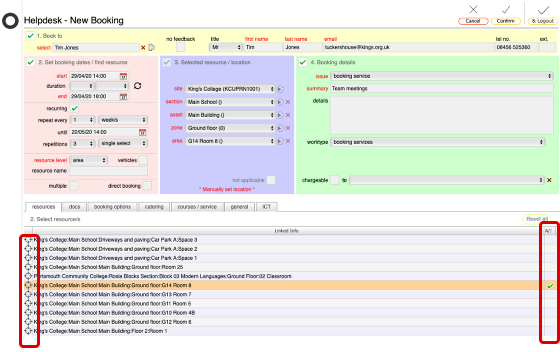
In this repeat booking example there are 4 rooms available for all dates. (When using the single select option, only rooms that are available for ALL dates will be listed)
Select which room you want by clicking in the select box on the right of the relevant row or by clicking the target button to the left of the row.
Repeat booking result (grid select)
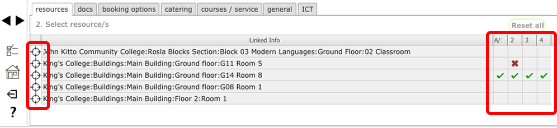
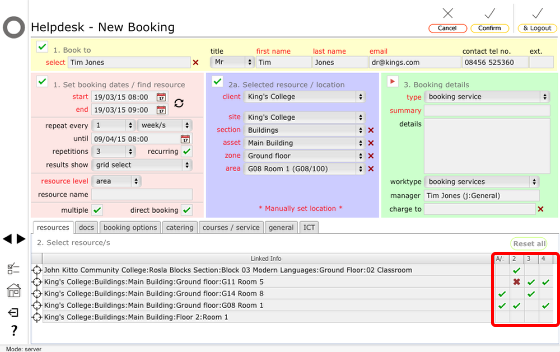
In this repeat booking example there are 4 rooms available, but G14 Room 5 is already booked for the second date in the series (indicated by a red cross in the date selection box). G14 Room 8 has been selected for all 4 dates in the series.
Select which room you want for each date (in this example only 1 room per date is allowed) by clicking in the select box on the right of the relevant row.
NOTE: Clicking the target button on the left will select all dates for the resource on that row if possible.
Repeat booking result (grid select) with works clashes

If there are known clashes with already scheduled works for any of the potentially bookable resources/locations, an exclamation mark will show in the selection tick box on the right for the affected row/s.
It is still possible to select the resource for the booking but an alert will show confirming that there are scheduled works for that location, date and time.
Works clashes alert message
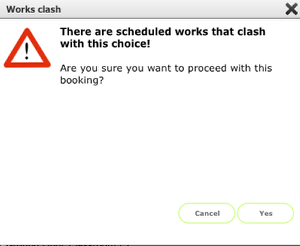
If you attempt to select a resource, date and time that is know to clash with already scheduled works, you will see this alert message. You can choose to continue with the booking but are advised to consult relevant personnel to see if either the booking or the scheduled works needs to be re-scheduled.
Adding option for multiple resources per date
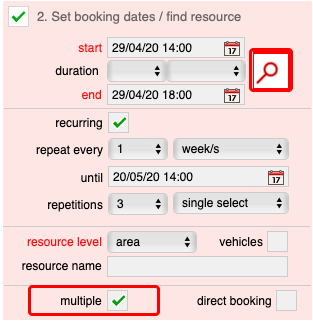
If you want to be able to select multiple resources / locations per date, tick the multiple box.
Click the Find button to locate available resources for the entered dates and times.
Multiple repeat booking search result
In this example, multiple locations are allowed per date and 1 room has been selected for the first date, 2 rooms for the second and third dates and 3 rooms for the final date.
Restrict choice by name
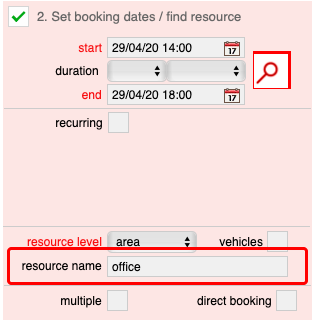
If you know the name of the location or resource you want to book you can enter part of the name in the resource name field.
Click the Find button to locate available resources for the entered dates and times.
Vehicle bookings

To specifically search for vehicles or when booking a vehicle directly the vehicle tick-box must be checked. This will be set by default if booking a vehicle directly from the resource record.
Restrict choice by location
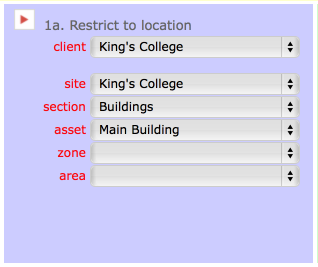
Before you click the find button in the pink section, you can also restrict the choice of locations by making selections in the blue section. In this example only bookable locations in Main Building will be listed for selection.
NOTE: If you trigger a new booking directly from a bookable resource record, this section will be preset to the appropriate location.
Add details in the green section
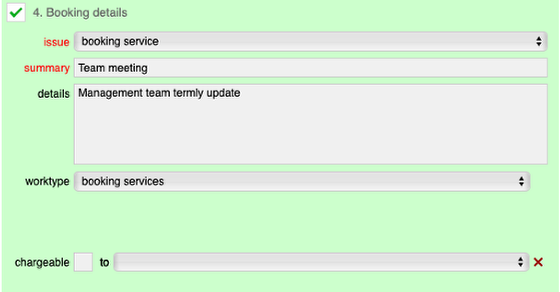
Once you have selected the rooms or resources you want, add any additional details in the green section, typically confirming the name of the event in the summary field and adding any other details required in the details field.
Click Confirm to make booking / request
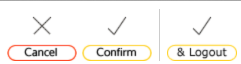
When all sections of the form are showing ticks to indicate minimum info has been correctly entered, click the main Confirm button (or Confirm & Logout) to make the booking or register the request.